Kids A-Z is an online portal students use to access developmentally appropriate eBooks and eResources at school or at home. But before students can begin using our secure, online learning environment, teachers must roster their students for all subscribed products that include eLearning resources. Below you will find a step-by-step guide for rostering your students.
To begin creating your classroom roster, click the My Classroom button after logging in to Kids A-Z using your teacher username and password.
Option 1: Add Students Manually
- Click the Add Students button.
- Create a unique username for each student.
- Associate each username with a student's first and last name (only visible to the logged in teacher).
- Assign specific learning levels for each student.
- Assign a unique password for each student.
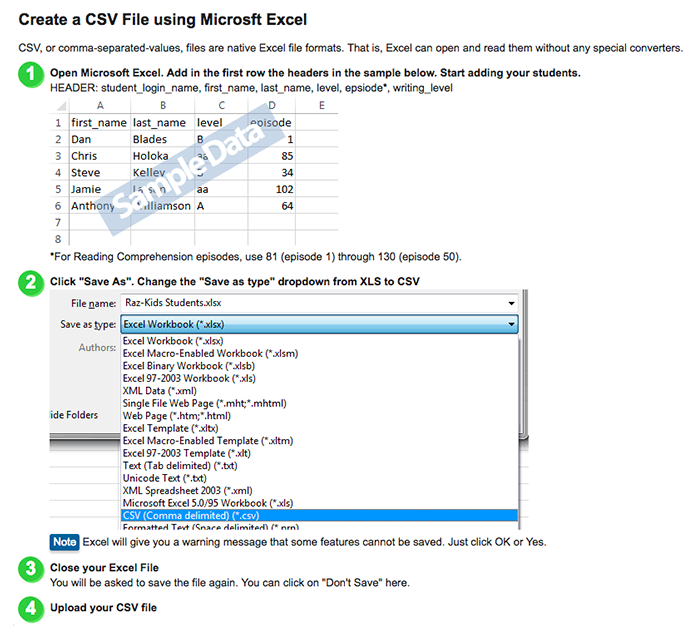
Option 2: Upload Using a CSV File
- Click the Add Students button.
- Click the Upload CSV File Button.
- Upload your CSV file.
- Assign specific subscription levels for each student.
- Assign a unique password for each student.
Need Help Creating Your CSV File?

What's Next?
After creating your classroom roster, you can assign more general and subscription-specific features to your class or individual students using the resource tabs above your roster. These include turning on or off Raz Rocket incentives, granting parental access for individual students, and more.
What If I Accidentally Delete a Student from My Roster?
All student data is securely stored for one year. To retrieve any student data that was removed accidentally, click the Add Students button and then click the Restore Removed Students button.
Ready to Get Started?
Log in to Kids A-Z to begin adding your classroom roster.
Want to Learn More About Kids A-Z?
Learn more about our eLearning portal and teacher management hub.


